Showing posts with label Halloween. Show all posts

Friday, October 28, 2011

Eyeball Truffles


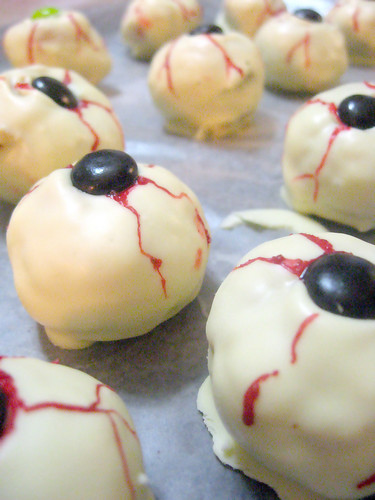
These were a MAGOR hit at a recent Halloween party.  They are great for other occasions, too, if you leave off the blood-shot veins and pupils. . . and add sprinkles or something:)

{What you need}
1 package double stuff oreos {make sure they are double stuff!}
1, 8 oz. cube cream cheese
24 oz. white chocolate chips
4 tablespoons vegetable shortening
2 lil' tubes of red cake decorating gel
dark colored m&m's

Crush all the oreos in a food processor and add cream cheese until a thick dough forms.  Form small balls from the dough and place on a wax paper covered cookie sheet.  Place in the freezer until they become firm enough to handle.  While they are in the fridge, melt the chocolate and shortening together.  Dip each oreo ball in the chocolate and place back on the wax paper.  Use the red gel to make "veins" coming out of the center of each truffle.  Place an m&m in the intersection of all the "veins" and see the eyeballs come to life!  Keep in the freezer until you are ready to serve.  These are absolutely DELICIOUS!!

Spooky Guac


Another fun appetizer for the Halloween season!  So easy and very entertaining. . .

{What you need}
your choice of guacamole
your choice of chips
a jackolantern

Arrange the guacamole coming out of the jackolantern's mouth so that it looks like. . . . you know.  This would work great with any type of "textured" dip:)  Good eatin!

Mummy Dogs


This is a cute little twist on the traditional pigs in a blanket.  It's great for entertaining around Halloween.

{What you need}
2 cans crescent rolls
12 links of your favorite PRECOOKED sausage/brauts, cut in half
mustard

{The pictures pretty much explain the assemblage themselves}
Cut each cresent roll triangle of dough into strips and wrap them around the dog, leaving a gap to put two little drops of mustard after they come out of the oven.  Repeat for all 24 mummies.  Cook according to the cresent roll instructions.  Let them cool for about 5 minutes and then put two little dots of mustard on the gap so it looks like eyes.  Very cute and fun!!

Sunday, October 31, 2010

Creamy White Chili


Happy Halloween!! My mom would make this delicious chili for us on Halloween when we were kids.  We've also made it for baby blessings, showers, and big family get togethers.  It's go a great clean taste and doesn't leave you feeling heavy like some chilies do.  Perfect for the colder months!

{What you need}
2 lb. boneless chicken breast, cut into small cubes
2 medium onion, minced
3 tsp. garlic powder
2 tbs. vegetable oil
4 cans Great Northern beans, rinsed and drained
2 cans (14.5 oz ea.) chicken broth
2 cans (4 oz ea) chopped green chilies
2 tsp. salt
2 tsp. cumin
2 tsp. oregano

1 tsp. pepper
1/2 tsp. cayenne pepper
2 cup sour cream
1 cup whipping cream
Monterey jack cheese for topping

In a large sauce pan, saute chicken, onion, and garlic powder in oil until chicken is no longer pink.  Add beans, broth, chilies and seasons and bring to a boil.  Reduce heat and simmer uncovered for 30 minutes.  Remove from heat and stir in sour cream and whipping cream.  Serve immediately, topped with cheese.

Compliments of Jackie Durrant

Monday, October 25, 2010

Dead Witch Fingers

Halloween is so much fun!  My mom would make these for our annual Halloween parties and serve them with other fun goulish gourment treats, like this.  Can you imagine how much fun these were for us as kids??  Your babies will have a blast with them, too.  And not only do they look the part, they are super tasty, too!  You just can't go wrong with peanut butter and pretzles, even if they are in the form of bloody fingers.

{What you need}   
1 cup creamy peanut butter
1 cup powdered sugar
1/2 cup caro syrup
1/4 cup powdered milk
food coloring, green or orange
1 package large pretzle rods, each broken in half
1 package slithered or whole almonds
red cake gell

Mix a few drops of food coloring with caro syrup until it is evenly colored.  Combine the PB, sugar, syrup, and milk powder in a medium bowl and mix together to form a dough.  Take a small amound of dough and mold it around a pretzle rod half to look like a finger.  Leave a little of the pretzle hanging out the end so it looks like a broken bone.  Take an almond and stick it on the end of the finger.  Take a butter knife and make little indentations for the knuckles.  Add the red gel wherever you would like so it looks bloody.  A little gourment gore for you and your little gouls and boils!

Kitty Litter Cake

Happy Halloween!!  My mom, bless her, always made Halloween so much fun for us growing up.  We'd have an annual Halloween Party and she would make hillarious spooky treats that were always delicious.  This cake, though the appearance may make you gag, is one of the most delicious cakes I have ever had!  If you can trick your mind into not being grossed out then you and your guests will be in heaven. 

{What you need}
1 white or yellow cake mix, prepared
1 spice or chocolate cake mix, prepared
1 large package instant vanilla pudding, prepared
2 rows white cream cookies, crumbled but not too fine 
(generic oreos, but the vanilla or lemon variety)
green food coloring or cake gel
10-20 tootsie rolls, the long skinny kind
1 cheap kitty litter box, NEW (the dollar store)
1 cheap kitty litter scooper, NEW (the dollar store)


Crumble and combine the cakes in the litter box.  Spoon dollops of the pudding around the crumbled cake and mix it in a little here and there.  Do not over mix.  Put a few drops of green food coloring or cake gel in a bag full of the crumbled cookies and shake until the crumbles are coated with green.  It doesn't need to be even.  Sprinkle the top of the cake with the green cookie crumbles and fluff the cake here and there, but do not mix it all in.  Lastly, microwave the tootsie rolls individually for about 10 seconds each, just until they are warm enough to mold but aren't melted.  Let your imagination loose as you form the tootsie rolls into little "kitty presents" and place them around the cake, fluffing the cake a little here and there so some of them are lightly covered.  You can leave the tootsie rolls out, if you want.  They are the kicker and are the main thing that dissenchants people from trying the cake.  But it is much more fun with them!  Let me know your guests' reactions if you try this:).  Trust me, it really is DELISH.     
Related Posts with Thumbnails